TL;DR - Test the meter before you trust the meter
A multimeter set to the wrong mode or range reads zero volts on a wire that has hundreds of volts of DC on it. People die from this every year on solar systems. Solar systems are DC, not AC, and DC kills differently than AC - it locks your muscles around the wire so you can't let go. Set the meter to DC volts (V with a straight line, not V with a wavy line). Set the range above the highest voltage you might see, typically 1000V DC for solar strings. Test the meter on a known live source first - a 9-volt battery works - before you trust a zero reading on a solar wire. Touch the meter probes to the wire while wearing Class 0 electrical gloves. Never trust a single reading. Test, retest, test a different wire. Then trust it.
He'd been a hobbyist his whole life. Worked on cars, fixed his own washing machines, rewired a lamp once a decade. When he started his off-grid build he figured the multimeter he'd had since the 1990s was good enough. He set it up on the bench, watched two YouTube videos, and went to test his first string of panels for voltage before connecting them to the combiner. The meter read zero. He frowned, tapped it, checked the dial, read zero again. He shrugged and reached for the bare conductor with bare hands to feel if it was warm. The arc from the wire to his fingernail blew him backwards eight feet onto the gravel. Three burns on his right hand, one through the steel band of his watch and into his wrist. His wife heard him hit the ground and came running. He spent eleven days at the burn center in Salt Lake City. The wire he'd touched had 392 volts of DC on it. His meter had been set to AC volts. AC mode on a DC circuit reads zero. The meter was working perfectly. It just wasn't reading what he thought it was reading. He'd been one inch from the chest contact that would have stopped his heart. He'd worked on his car battery for thirty years and never been hurt. He'd thought solar was the same thing scaled up. Solar is not the same thing scaled up. Solar runs at voltages that arc through a quarter-inch of air. The multimeter that saved his life on a car battery told him a lethal wire was safe.
Who this is for
This guide is for the Utah retiree who almost lost his hand to a 392-volt DC string because his multimeter was set wrong. The Florida DIYer who's wired car stereos for twenty years and assumed solar was the same chemistry at higher numbers. The Texas first-time off-gridder who watched three YouTube videos and bought the cheapest multimeter on Amazon to do his commissioning tests. The Vermont cabin owner whose contractor handed him a Fluke and never showed him which mode to use. The Arizona homesteader who's about to ground-mount his first array and doesn't know that string voltage can hit 600V before the disconnect. The Colorado mountain homeowner who works on his system once a year and forgets the procedure between visits. The Pennsylvania father who's letting his teenage son help with the install because "it's just like a car battery." The Oregon DIY-er who tested his system once successfully and stopped testing every connection because "it worked last time."
Three things are true of every one of them.
A multimeter on the wrong setting reads zero on a wire that will kill you.
The voltage on a solar string is high enough to arc through air to your skin if you get close, before you ever touch the wire.
Testing a meter on a known live source before trusting a zero reading takes 15 seconds and prevents 100 percent of false-safe events.
Why solar DC is fundamentally different from your car battery
Most homeowners' experience with DC electricity comes from car batteries. 12 volts. You can grab both terminals with bare hands and feel nothing. The voltage is too low to push current through your skin.
Solar is not that. Solar strings run at voltages that range from 100 volts at the low end to 1500 volts at the high end of utility-scale systems. Residential off-grid strings commonly run 100-600 volts DC. That voltage is high enough to push lethal current through dry skin without you even touching the conductor.
DC at residential solar voltages does three things that AC and low-voltage DC do not.
It locks your muscles around the wire. AC alternates 60 times a second. When you grab a live AC wire, your muscles spasm with each cycle, which gives you brief release windows where you can pull away. DC doesn't alternate. When DC contracts your muscles, the contraction stays. You cannot let go. This is the single most important difference between AC and DC danger.
It arcs further through air. DC at 400 volts arcs across roughly a half-inch gap. AC at the same voltage arcs about a quarter that distance. If your hand approaches a 400V DC wire too closely, the electricity can jump to you before you touch anything. This is how the burn-victim story above happens.
Solar panels cannot be turned off. Every light source produces current. Daylight obviously. Overcast skies still produce current. Even moonlight produces a trickle. There is no breaker on the panels themselves. Until you physically cover every panel with an opaque tarp, the wires from the panels are live.
According to OSHA guidance on solar power industry hazards, DC arc flash incidents on photovoltaic systems produce temperatures up to 35,000 degrees F at the point of contact - four times hotter than the surface of the sun. The thermal damage to skin, eyes, and lungs from a single arc flash event is often more dangerous than the electrical shock itself.
This is the context that makes multimeter discipline a life-or-death procedure instead of an inconvenience. The wire that read zero on your meter might have enough voltage to jump to your hand before you even touch it.
WATTSON'S MULTIMETER TRUTH: At the US Solar Institute the instructor drilled three rules into every student until we could recite them in our sleep. Test the meter on something known live before you trust it on something that could kill you. Verify zero voltage three times before you make contact. And never, ever, work on a panel string when the sun is up - even with the disconnect open. He had a photograph he showed us. Burned forearm of a former student who had skipped step one. Meter had a dead 9-volt battery inside it. Read zero on everything. The student trusted the reading. Sixty days at the burn center. He showed that photograph the first hour of every class. Fifteen years later I still test the meter on a known live source every single time I pick it up. The fifteen seconds it takes is the cheapest insurance in off-grid solar.
Test like your life depends on it. Because it does.
Wattson's DC Solar Multimeter Procedure Card - the exact settings, the test-the-meter-first protocol, and the verify-zero-three-times rule that prevents false-safe readings on solar circuits.
GET THE PROCEDURE CARD ->The two ways the meter lies to you
Multimeter false-safe readings on solar systems come from two main causes. Both produce a "0V" reading on a wire that's actually carrying lethal voltage.
The wrong mode
Multimeters have multiple modes selected by the rotary dial. The relevant ones for solar work are:
- V with a wavy line (V~): AC voltage. House wiring. Inverter output to your AC panel.
- V with a straight line (V---): DC voltage. Solar strings. Battery banks. Charge controller input and output.
If you set the meter to AC volts and probe a DC circuit, the meter reads zero or near-zero. The meter is functioning correctly. It's measuring AC and there is no AC. The wire is full of lethal DC the meter isn't looking for.
The opposite is also true. Set the meter to DC volts and probe an AC circuit and you get inaccurate or zero readings. AC is what your inverter outputs. DC is what your panels and batteries produce.
The fix: before every test, look at the dial. Confirm it is on V with a straight line for any solar DC work, V with a wavy line for any AC work. Verbalize it out loud if necessary: "DC volts. The dial is on DC volts."
The wrong range, or wrong meter
Cheap multimeters - the $10-20 ones from hardware stores or Amazon's bottom shelf - often have:
- Manual ranges that you must set correctly before testing. If the range is set to 200V DC and you probe a 400V string, the meter shows "OL" (over limit) or zero depending on the model.
- No CAT III safety rating. CAT III is the minimum certification for working on permanent installations like solar. A non-CAT-III meter can fail catastrophically when probing high-energy circuits. Arc flash from a meter failure injures the tester.
- Worn or damaged probe leads. Frayed leads, missing tips, or cracked insulation can produce false zero readings or expose the tester to live voltage.
- Dead internal batteries. A meter with a dead battery often still appears to power on - the display lights up - but reads zero on everything. This is the failure mode that injured the student in the Wattson backstory.
The fix: invest in a Fluke 117 or equivalent CAT III multimeter for $150-200. Set it to auto-range so you can't get the range wrong. Replace internal batteries annually whether they need it or not. Inspect probe leads before every use - frayed, cracked, or missing-tipped leads get replaced immediately, not "next time."
The verify-the-meter protocol
This is the procedure that prevents 100 percent of false-safe readings. Run it every time you pick up the meter before you trust any reading on a solar system.
- Select the correct mode. DC volts (V---) for solar strings, battery banks, charge controller terminals. AC volts (V~) for inverter output side.
- Test the meter on a known live source. For DC mode, a fresh 9-volt battery is perfect - the meter should read 9.0V to 9.5V. For AC mode, a known-live wall outlet should read 110-125V. If the meter reads anything else, the meter is broken or set wrong. Do not use it.
- Test the leads. Touch the probes together while the meter is on a low resistance mode. The reading should be 0.0 to 0.3 ohms. Higher means damaged leads.
- Verify the test point is what you think. Trace the wire from the source. Confirm you're testing the wire you intend to test. Mislabeled wires cause as many incidents as wrong meter settings.
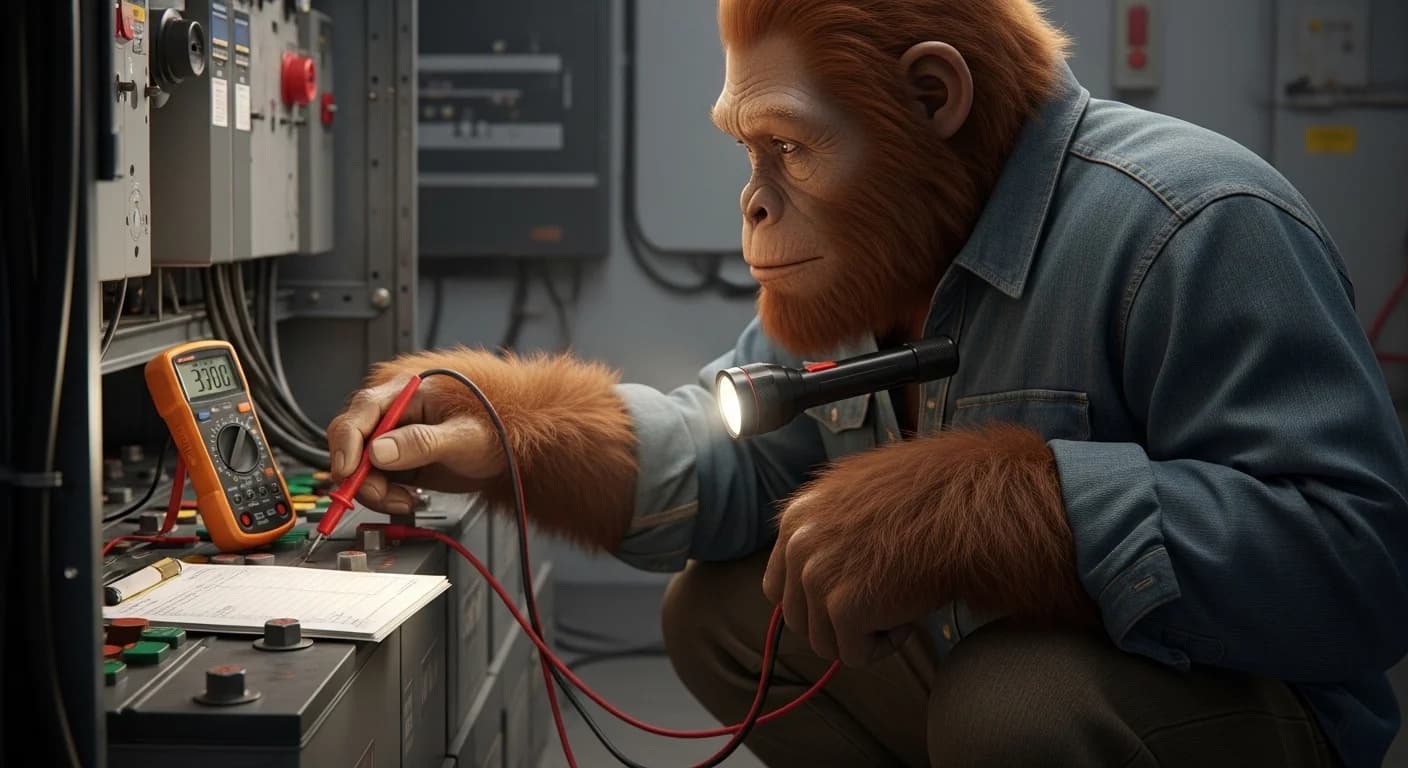
- Apply probes to the test point. Black probe to the negative terminal or chassis ground, red probe to the wire being tested. Hold the probe tips - not the metal shaft - and keep your hands behind the finger guards on the probes.
- Read the meter twice. Lift the probes, settle yourself, apply them again. Confirm the same reading. A single reading can be a probe-contact issue or transient effect. Two consistent readings is the minimum.
- Verify the zero on a known-live point. If you got zero, immediately probe a wire you know is live (the battery bank, for example) to confirm the meter still works. If it now reads correctly on the known-live wire, the original zero reading is valid. If it reads zero on the known-live wire too, your meter has died since step 2.
The whole protocol takes 60 seconds. Run it every time. No exceptions.
When you absolutely must not touch the system
Some conditions mean you don't test, you don't probe, you don't approach. You wait or you call a professional.
- Sunlight is hitting the panels and the panels are not covered. Solar strings remain energized to full voltage. Even with the DC disconnect open, the wires from panels to disconnect are live. Cover with opaque tarps before touching anything.
- Rain, snow, or visible moisture on the equipment. Water dramatically increases conductivity. Lethal voltage paths form through water films you can't see. Wait for dry conditions.
- You smell ozone, burning plastic, or hot insulation. An active fault is underway. Open the main disconnect from a safe distance, ventilate the area, call a fire department or solar tech depending on severity.
- You see visible arcing, sparking, or scorch marks at any junction. Active electrical fault. Stand back, kill the breaker if you can reach one safely, call a pro.
- You are working alone with no one else on the property. DC contact injuries require immediate intervention to free the victim. Solo work on energized systems is the most common circumstance of fatal solar electrocutions.
- You are not wearing Class 0 electrical gloves rated for at least 1500V DC. Leather gloves do not protect against electrical voltage. Cotton, mechanic's, or work gloves do not protect. Class 0 dielectric gloves are the only acceptable hand protection. $80-150 from any electrical supply company.
- The voltage you might encounter exceeds your meter's CAT rating. A CAT III 600V meter is not safe for measuring a 1000V utility-scale string. Match the meter to the work.
When to stop and call a pro
Call a licensed solar electrician if any of these apply.
- You don't know what voltage to expect at the test point
- You don't know which mode your meter should be on
- The meter behaves unexpectedly during the verify-meter protocol
- You see fault indications on the equipment (scorch marks, melted insulation, error codes you don't understand)
- The system was installed before you owned the property and you don't have wiring diagrams
- You are about to work on a string voltage above 600V DC for the first time
- You are working on a roof or any height where a startle response from electrical contact could cause a fall
- You have any condition - cardiac, neurological, recent surgery - that increases the consequences of electrical contact
A professional consultation costs $150-300. A burn center visit costs $40,000-$200,000 and can permanently disable the hand you use to make a living.
Frequently asked questions
Can I use a $15 multimeter on my solar system? Not safely. Cheap meters lack CAT III safety rating, have no auto-range, often have poor probe lead quality, and can fail catastrophically when probing high-energy circuits. The Fluke 117 at $150-200 is the entry-level professional standard. The cost difference is one burn center visit deductible.
What does CAT III mean and why does it matter? CAT (Category) ratings define the maximum transient voltage a meter can safely handle without arc flash failure. CAT II is wall outlets. CAT III is permanent installations like solar panels, breaker panels, and motor controls. CAT IV is utility service entrance and overhead lines. Use CAT III minimum for any solar work. The rating is printed near the input jacks on the meter.
My meter has both V= and V~ on the dial. Which is DC? V with a horizontal straight line (V---) or V= is DC voltage. V with a wavy line above (V~) is AC voltage. Some meters mark them differently. Read the manual once, confirm by testing on a DC source (9V battery) and known AC source (wall outlet), and remember which symbol is which on your specific meter.
How do I know what voltage to expect on my solar string? Add up the open-circuit voltage (Voc) of each panel in series. If you have 10 panels with Voc of 38.4V each, your string Voc is 384V. Real-world voltages can spike 15-20% above nameplate in cold weather, so plan for up to 460V on that string. Your meter range must exceed this number.
Can I test my batteries with the same meter I use for the panels? Yes, if the meter is rated for the highest voltage you'll encounter in either circuit and is set to the right mode for what you're testing. A 12V battery requires DC mode and a range above 12V. A 384V solar string requires DC mode and a range above 384V. The same Fluke 117 handles both.
Do I need to test for AC voltage anywhere on my off-grid system? Yes. The output side of your inverter is AC and powers your house wiring. Test inverter output with AC mode. Test inverter input (from batteries) with DC mode. Test everything between panels and inverter input with DC mode. The mode follows the circuit, not the location.
What's the most common multimeter mistake people make? Skipping the verify-meter-first step. The user assumes the meter is working because the screen lit up. The meter has a dead internal battery or wrong setting and reads zero on everything. The user trusts the zero reading. Then touches a live wire. Test the meter on a known live source every time.
My meter is reading something between zero and the expected voltage. What does that mean? Multiple possibilities. Probe lead contact may be poor - clean the probe tips. The circuit may have a partial fault drawing voltage down. The wire you think you're testing may be the wrong wire. Stop, retest, verify what you're connected to before drawing conclusions.
Can I just use a non-contact voltage tester instead of a multimeter? Non-contact testers (NCVTs) are a great first check but not sufficient on their own for solar work. They're designed primarily for AC and can give false negatives on DC. Use NCVT as a screening tool - if it lights, definitely don't touch. If it doesn't light, you still need to verify with the multimeter before contact.
Why do my readings change when I'm not touching the wire? Solar string voltages can shift several volts per minute as cloud cover, panel temperature, and sun angle change. You're seeing real changes in the open-circuit voltage of the panels. This is normal. Your concern is whether the wire is energized at all (yes/no), not the precise voltage number.
Can I trust the voltage reading on my charge controller display instead of using a meter? No. Use the display as a reference but never as your sole source of voltage information before touching a wire. Display sensors can fail, calibration can drift, and the display only shows what the controller is connected to - not necessarily the wire you're about to handle. Always verify with your own meter at the actual test point.
Conclusion
A multimeter is a tool that lies when used wrong. Set to the wrong mode, the wrong range, or with a dead internal battery, it reads zero volts on wires carrying enough DC to stop your heart. People die from this every year on solar systems.
DC solar is not your car battery scaled up. Residential solar strings run at 100-600 volts of DC, and DC at those voltages does three things low-voltage DC does not. It arcs through air to your skin before you touch the wire. It locks your muscles around the wire so you cannot let go. And the panels themselves cannot be turned off until you cover them with opaque tarps.
The procedure is simple. Pick the right mode. Pick the range. Test the meter on a known live source first. Verify zero three times before contact. Wear Class 0 electrical gloves rated for 1500V DC. Work in daylight only when panels are covered.
The fifteen seconds it takes to test the meter on a 9-volt battery is the cheapest insurance in off-grid solar. The eleven days at the burn center is what happens when you skip it.
The complete Maintenance and Troubleshooting guide ->